Nemo, the default Cinnamon file manager, is far superior to Gnome's default Files application (Nautilus) in terms of features. Nemo was forked from Nautilus 3.4, so it includes features removed from Nautilus, like dual panels (split view), list view, configurable toolbar, as well as type-ahead find (type to select files instead of using a full-blown search). There are some features that were added later too, like a plugins manager.
The problem with Nemo is that it's especially designed for the Cinnamon desktop, and there are some annoyances / inconveniences when using it on other desktop environments, such as Gnome.
This article tries to cover these inconveniences and suggest workarounds for Ubuntu 18.04, 18.10 and 19.04 (Gnome desktop) where possible, to make the most of Nemo and properly integrate it with the desktop.
Features available in Nemo file manager that are not present in Nautilus (Gnome Files) / differences include:
Besides these, there are some extra features, implemented after Nemo was forked from Nautilus, like a Plugins Manager (lets you easily enable or disable extensions, scripts, and actions), enhanced Open With dialog, "Open as root" and "Open in terminal" context menu items, and many others.
The Nemo desktop handling is also more customizable than the one available in Ubuntu 18.04, 18.10 or 19.04 (despite still being available in Ubuntu, desktop handling was removed from Nautilus upstream), because it allows changing the desktop icon size and arranging icons horizontally or vertically.
If you need some of these features and you're prepared to replace Nautilus with Nemo on your Ubuntu 18.04 / 18.10 / 19.04 Gnome desktop, continue reading this article. Everything in this article is optional, so for example you don't have to use Nemo to draw the desktop icons if you don't want to - you can continue using Nautilus for this (but it'll use some extra resources for that).
Nemo 3.6.5 is available in the Ubuntu 18.04 repositories, while Nemo 3.8.5 is available for Ubuntu 18.10 and 19.04. To install it, search for Nemo in the Software app and install it from there, or use this command:
If you want to install the latest Nemo version in Ubuntu 18.04, 18.10 or 19.04, you'll have to either build it yourself from source or use a PPA. Also, most Nemo extensions are not available in the official Ubuntu 18.04 and newer repositories so unless you add a PPA or install them from source, you won't have access to important extensions like the Nemo Dropbox extension, and many others.
A quite popular PPA is embrosyn's Cinnamon Stable PPA which includes Nemo 4 for Ubuntu 19.04, 18.10 and 18.04. Note that it's likely this PPA will be updated with newer Nemo versions as they are released.
To see the Nemo changelog (and find out the differences between the latest released version and the version from the Ubuntu repositories), click here.
You can add the PPA and install the latest Nemo in Ubuntu 18.04, 18.10 or 19.04 by typing these commands in a terminal window:
To list the available Nemo extensions you can use this command:
This lists all Nemo extensions (and Nemo itself obviously) as well as some unrelated packages, so make sure you read the package description before installing it. Once you decide which package you want to install, use the usual
The Nemo-Dropbox extension depends on a "dropbox" package that's not available in the official Ubuntu 18.04, 18.10 or 19.04 repositories but you can download it from here (download the deb appropriate for your Ubuntu architecture - 32bit or 64bit). Before installing this package you'll need to remove the
Installing Nemo (either from the official Ubuntu repositories or from the PPA) also installs some minimal Cinnamon dependencies, but it won't install the complete Cinnamon desktop like it did a while back, so it won't mess with your Gnome desktop.
Nemo has some theming issues in Ubuntu 18.04, 18.10 and 19.04 with most themes. For example, using the default Ubuntu theme (Ambiance), the sidebar has a gray area at the bottom and the file / folder rename box doesn't have a border:
With Communitheme, which was recently updated with some Nemo fixes, the sidebar looks ok, but the rename box is completely invisible with a transparent text selection, which makes it very difficult to rename files using Nemo:
This is actually the case with many modern themes, including Canta (an arguably amazing GTK theme), Gnome-OSC and Materia. On the other hand, Numix and Adapta behave like Ambiance as far as the rename box goes.
Your options for these theming issues are:
If you opted for the second solution - to install the default Linux Mint 19 theme (Mint-Y), here's what you must do. Mint-Y is part of the mint-themes package, which depends on the mint-y-icons and mint-x-icons packages, so you'll need all of these 3 packages. Download these deb packages by using the links below:
Make sure to download the latest version for each of these packages (it should be the last one at the bottom - the date is displayed next to each package if you're unsure which is the newest).
Place the downloaded debs in your home folder and run this command to install them:
If you prefer to install them using a graphical package manager (by double clicking the deb packages and then clicking Install), install the icon packages first and only then the mint-themes package, or else mint-themes will complain about missing dependencies.
As a bonus, by using Mint Y theme, you'll also get a different background for the Nemo active / inactive panels in a dual panel view (a second panel can be opened by using the F3 key).
Now use the Tweaks application to change the Applications theme to Mint-Y (do not use Mint-X as that's outdated, and some Gnome applications won't look like they're supposed to). Feel free to also change the icon theme to Mint-X or Mint-Y too if you like them.
If you want to set Nemo as the default file manager for opening folders in Ubuntu 18.04, 18.10 or 19.04 - for instance to run Nemo when clicking the
This is obviously optional, and it depends on how you want to use Nemo file manager.
This is not needed in Ubuntu 19.04. That's because Ubuntu 19.04 ships with the Desktop Icons Gnome extension, and doesn't use Nautilus to draw the desktop icons!
Despite Nautilus no longer supporting desktop icons, this feature is still present in the Nautilus package shipped with Ubuntu 18.04 and 18.10. The Nemo desktop handling is however superior, at least in my view, because it lets users change the icon size and arrange icons horizontally or vertically. But it's up to you if you need these features / want to use Nemo or Nautilus for managing your desktop icons.
There's a minor issue when using Nemo to draw the desktop in Ubuntu 18.04 or 18.10 though. You won't be able to access the context (right click) menu item for changing the desktop wallpaper when using Nemo to draw the desktop. You can still do this from
If you want to use Nemo instead of Nautilus for displaying your desktop icons, follow the steps below.
1. Disable Nautilus from displaying desktop icons by using this command:
2. Add nemo-desktop to startup
In recent Nemo versions, a separate executable / process is used for handling the desktop:
Once you're done, click the
3. Logout, then log back in and Nemo should now be used for displaying your desktop icons.
Extra: Nemo only displays icons on the primary monitor by default. In case you want it to display icons on multiple monitors, use
Undoing the changes mentioned in this article and making Nautilus default is quite easy. Simply follow the steps below (depending on what you've followed from this article).
1. To make Nautilus the default file manager (to open directories in Nautilus instead of Nemo) like it is on a default Ubuntu 18.04, 18.10 or 19.04 installation, use this command:
2. To stop Nemo from handling the desktop icons, open Startup Applications and uncheck the box next to Nemo Desktop.
3. You may also want to have Nautilus draw desktop icons again, like it does on a default Ubuntu 18.04 installation. To achieve this, run this command in a terminal:
4. Now log out and log back in and you should have Nautilus drawing the desktop icons instead of Nemo.
5. Optionally you can also completely purge Nemo file manager, by using this command:
And remove any dependencies installed by Nemo (this will remove all packages that are no longer needed, and not just those installed by Nemo):
The problem with Nemo is that it's especially designed for the Cinnamon desktop, and there are some annoyances / inconveniences when using it on other desktop environments, such as Gnome.
This article tries to cover these inconveniences and suggest workarounds for Ubuntu 18.04, 18.10 and 19.04 (Gnome desktop) where possible, to make the most of Nemo and properly integrate it with the desktop.
 |
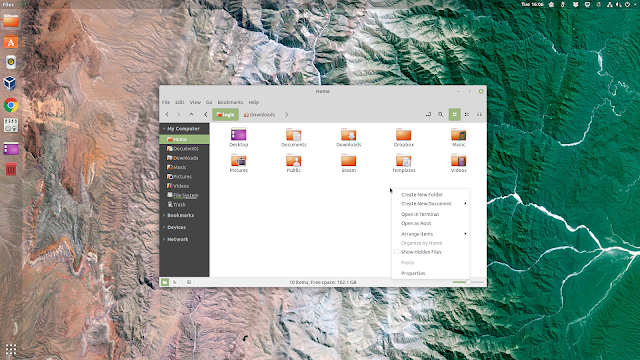
| Nemo file manager on Ubuntu 18.04 desktop (Gnome) |
Features available in Nemo file manager that are not present in Nautilus (Gnome Files) / differences include:
- type-ahead search (type to select files instead of using a full-blown search)
- dual panel view (open a second panel when using the F3 key)
- sidebar tree view
- configurable toolbar (you can show or hide most toolbar elements)
- displays available disk space in the statusbar
- in-place rename (instead of using a popup like recent Nautilus versions)
- separate archive creation / extraction window instead of having it integrated in the toolbar like recent Nautilus versions
- many other small but useful features
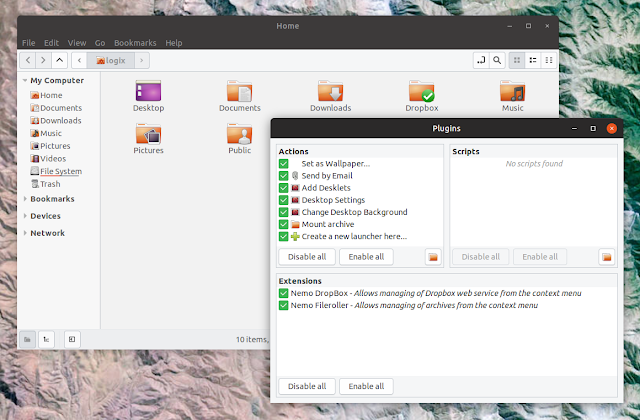
Besides these, there are some extra features, implemented after Nemo was forked from Nautilus, like a Plugins Manager (lets you easily enable or disable extensions, scripts, and actions), enhanced Open With dialog, "Open as root" and "Open in terminal" context menu items, and many others.
 |
| Nemo and its plugins manager on Ubuntu 18.04 |
The Nemo desktop handling is also more customizable than the one available in Ubuntu 18.04, 18.10 or 19.04 (despite still being available in Ubuntu, desktop handling was removed from Nautilus upstream), because it allows changing the desktop icon size and arranging icons horizontally or vertically.
If you need some of these features and you're prepared to replace Nautilus with Nemo on your Ubuntu 18.04 / 18.10 / 19.04 Gnome desktop, continue reading this article. Everything in this article is optional, so for example you don't have to use Nemo to draw the desktop icons if you don't want to - you can continue using Nautilus for this (but it'll use some extra resources for that).
How to install Nemo file manager (and Nemo extensions) in Ubuntu 18.04, 18.10 or 19.04
Nemo 3.6.5 is available in the Ubuntu 18.04 repositories, while Nemo 3.8.5 is available for Ubuntu 18.10 and 19.04. To install it, search for Nemo in the Software app and install it from there, or use this command:
sudo apt install nemoIf you want to install the latest Nemo version in Ubuntu 18.04, 18.10 or 19.04, you'll have to either build it yourself from source or use a PPA. Also, most Nemo extensions are not available in the official Ubuntu 18.04 and newer repositories so unless you add a PPA or install them from source, you won't have access to important extensions like the Nemo Dropbox extension, and many others.
A quite popular PPA is embrosyn's Cinnamon Stable PPA which includes Nemo 4 for Ubuntu 19.04, 18.10 and 18.04. Note that it's likely this PPA will be updated with newer Nemo versions as they are released.
To see the Nemo changelog (and find out the differences between the latest released version and the version from the Ubuntu repositories), click here.
You can add the PPA and install the latest Nemo in Ubuntu 18.04, 18.10 or 19.04 by typing these commands in a terminal window:
sudo add-apt-repository ppa:embrosyn/cinnamon
sudo apt install nemo
To list the available Nemo extensions you can use this command:
apt-cache search nemoThis lists all Nemo extensions (and Nemo itself obviously) as well as some unrelated packages, so make sure you read the package description before installing it. Once you decide which package you want to install, use the usual
sudo apt install PACKAGENAME to install it or search for the package name in Gnome Software / Synaptic Package Manager, etc. and install it from there.The Nemo-Dropbox extension depends on a "dropbox" package that's not available in the official Ubuntu 18.04, 18.10 or 19.04 repositories but you can download it from here (download the deb appropriate for your Ubuntu architecture - 32bit or 64bit). Before installing this package you'll need to remove the
nautilus-dropbox package. So the steps are like this: remove the nautilus-dropbox package, install the externally downloaded (see link a few lines above) dropbox package and finally install the nemo-dropbox package from the PPA listed above.Installing Nemo (either from the official Ubuntu repositories or from the PPA) also installs some minimal Cinnamon dependencies, but it won't install the complete Cinnamon desktop like it did a while back, so it won't mess with your Gnome desktop.
Workarounds for Nemo theming (including rename box) issues in Ubuntu 18.04, 18.10 or 19.04
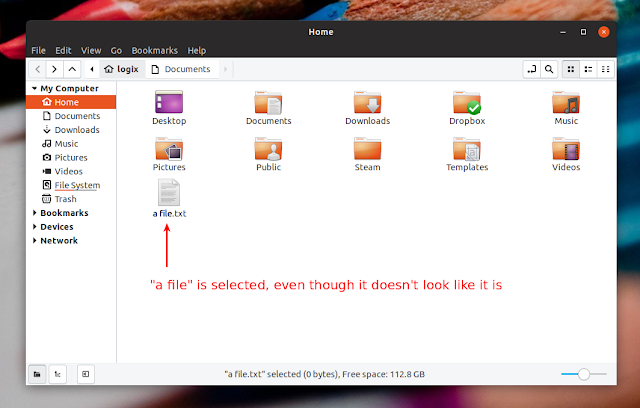
Nemo has some theming issues in Ubuntu 18.04, 18.10 and 19.04 with most themes. For example, using the default Ubuntu theme (Ambiance), the sidebar has a gray area at the bottom and the file / folder rename box doesn't have a border:
With Communitheme, which was recently updated with some Nemo fixes, the sidebar looks ok, but the rename box is completely invisible with a transparent text selection, which makes it very difficult to rename files using Nemo:
This is actually the case with many modern themes, including Canta (an arguably amazing GTK theme), Gnome-OSC and Materia. On the other hand, Numix and Adapta behave like Ambiance as far as the rename box goes.
Your options for these theming issues are:
- stick with Ambiance theme and other themes that at least display highlighted text in the rename box and ignore the ugliness since it's just a minor annoyance :-)
- install the default Linux Mint 19 theme (includes the default light theme as well as dark and darker variants), called Mint Y, which looks perfect with Nemo.
If you opted for the second solution - to install the default Linux Mint 19 theme (Mint-Y), here's what you must do. Mint-Y is part of the mint-themes package, which depends on the mint-y-icons and mint-x-icons packages, so you'll need all of these 3 packages. Download these deb packages by using the links below:
Make sure to download the latest version for each of these packages (it should be the last one at the bottom - the date is displayed next to each package if you're unsure which is the newest).
Place the downloaded debs in your home folder and run this command to install them:
sudo dpkg -i mint*.debIf you prefer to install them using a graphical package manager (by double clicking the deb packages and then clicking Install), install the icon packages first and only then the mint-themes package, or else mint-themes will complain about missing dependencies.
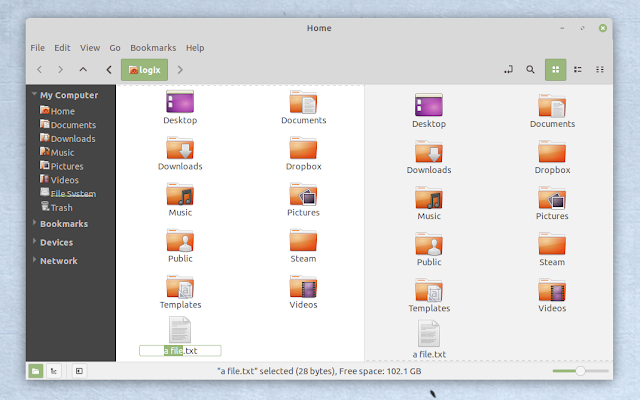
As a bonus, by using Mint Y theme, you'll also get a different background for the Nemo active / inactive panels in a dual panel view (a second panel can be opened by using the F3 key).
 |
| Nemo on Ubuntu 18.04 with Mint-Y theme - proper rename box and highlighted active panel |
Now use the Tweaks application to change the Applications theme to Mint-Y (do not use Mint-X as that's outdated, and some Gnome applications won't look like they're supposed to). Feel free to also change the icon theme to Mint-X or Mint-Y too if you like them.
How to replace Nautilus (Gnome Files) with Nemo as the default file manager for opening folders on Ubuntu 18.04, 18.10 or 19.04 (Gnome) desktop
If you want to set Nemo as the default file manager for opening folders in Ubuntu 18.04, 18.10 or 19.04 - for instance to run Nemo when clicking the
Show in file manager button in web browsers, etc. -, all you have to do is run the following command:xdg-mime default nemo.desktop inode/directory application/x-gnome-saved-searchThis is obviously optional, and it depends on how you want to use Nemo file manager.
How use Nemo instead of Nautilus (Gnome Files) for managing desktop icons on your Ubuntu 18.04 or 18.10 Gnome desktop
This is not needed in Ubuntu 19.04. That's because Ubuntu 19.04 ships with the Desktop Icons Gnome extension, and doesn't use Nautilus to draw the desktop icons!
Despite Nautilus no longer supporting desktop icons, this feature is still present in the Nautilus package shipped with Ubuntu 18.04 and 18.10. The Nemo desktop handling is however superior, at least in my view, because it lets users change the icon size and arrange icons horizontally or vertically. But it's up to you if you need these features / want to use Nemo or Nautilus for managing your desktop icons.
There's a minor issue when using Nemo to draw the desktop in Ubuntu 18.04 or 18.10 though. You won't be able to access the context (right click) menu item for changing the desktop wallpaper when using Nemo to draw the desktop. You can still do this from
System Settings > Background though. Also, I know many of you use various applications, like Variety or the Random Wallpaper Gnome Shell extension for changing the desktop background, so this is not such a big inconvenience.If you want to use Nemo instead of Nautilus for displaying your desktop icons, follow the steps below.
1. Disable Nautilus from displaying desktop icons by using this command:
gsettings set org.gnome.desktop.background show-desktop-icons false2. Add nemo-desktop to startup
In recent Nemo versions, a separate executable / process is used for handling the desktop:
nemo-desktop. To get Nemo to display desktop icons, open Startup Applications, click the Add button and use the following information in the dialog that pops up:- enter
nemo-desktopin theCommandfield - enter
Nemo Desktopin theNamefield
Once you're done, click the
Add button.3. Logout, then log back in and Nemo should now be used for displaying your desktop icons.
Extra: Nemo only displays icons on the primary monitor by default. In case you want it to display icons on multiple monitors, use
Dconf Editor to navigate to org / nemo / desktop and change the desktop-layout option from true::false to true::true. You can also use the old Nemo desktop handling (non-grid) if you want, by disabling the use-desktop-grid option which also resides in org / nemo / desktop.How to undo the changes and make Nautilus (Gnome Files) default again
Undoing the changes mentioned in this article and making Nautilus default is quite easy. Simply follow the steps below (depending on what you've followed from this article).
1. To make Nautilus the default file manager (to open directories in Nautilus instead of Nemo) like it is on a default Ubuntu 18.04, 18.10 or 19.04 installation, use this command:
xdg-mime default nautilus.desktop inode/directory application/x-gnome-saved-search2. To stop Nemo from handling the desktop icons, open Startup Applications and uncheck the box next to Nemo Desktop.
3. You may also want to have Nautilus draw desktop icons again, like it does on a default Ubuntu 18.04 installation. To achieve this, run this command in a terminal:
gsettings set org.gnome.desktop.background show-desktop-icons true4. Now log out and log back in and you should have Nautilus drawing the desktop icons instead of Nemo.
5. Optionally you can also completely purge Nemo file manager, by using this command:
sudo apt purge nemo nemo*And remove any dependencies installed by Nemo (this will remove all packages that are no longer needed, and not just those installed by Nemo):
sudo apt autoremove

