NFS (Network File System) is a distributed file system protocol that allows sharing directories and files with others over a shared network. Using it allows access to files on remote hosts as if they were local files.
Setting up a NFS mount on Ubuntu or Linux Mint can be quite a tedious task. Enter Simple NFS GUI. This is a GUI tool to easily set up a machine as a NFS server or client that should work on Ubuntu, Linux Mint and Debian.
Simple NFS GUI takes care of the whole NFS share configuration process. When setting up a NFS server, the tool automatically sets up the
I should note that while Simple NFS GUI automatically adds the network file system mount in
If you need to create multiple NFS shares, run the Simple NFS GUI setup process multiple times, specifying a different NFS share folder each time.
1. Simple NFS GUI requires Gambas 3 - adding a PPA on Ubuntu and Linux Mint is required.
Ubuntu, Linux Mint and flavors / derivatives: Simple NFS GUI requires Gambas 3. I'm not sure why but Gambas 3 is not available in Ubuntu or Linux Mint, while it is available in Debian (the version in Debian jessie is too old though, but newer Debian versions all have the required Gambas 3 version). The Gambas developers are maintaining a PPA to allow installing the latest Gambas 3 in Ubuntu, Linux Mint, as well as Ubuntu flavors like Lubuntu, Kubuntu, Xubuntu, Ubuntu MATE, and so on. Add the PPA and update the software sources:
2. Download and install Simple NFS GUI
Visit this page, scroll down to the bottom and click the blue
3. Starting the Simple NFS GUI application
Don't run Simple NFS GUI from your applications menu as it won't work. That's because the application needs to be started as root, and its application menu entry runs it without admin privileges.
If your system still has
For Ubuntu 18.04 and newer, Linux Mint 19 and newer, or Debian buster, which don't have
Now you can use Simple NFS GUI to set up a machine as a NFS client or server.
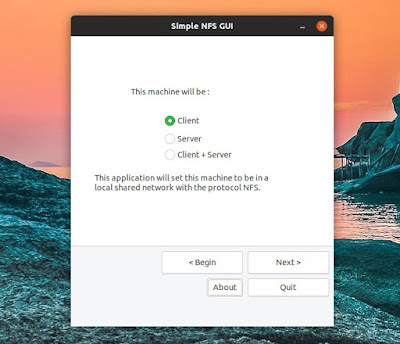
To setup a machine as a network file system (NFS) client using Simple NFS GUI, start the application, select
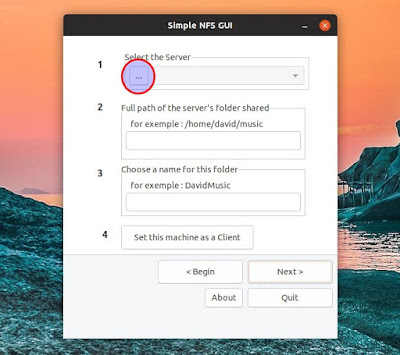
On the next screen, click the
It may take a while until the IP list is populated, because a package may be need to be installed on your system to detect the IPs, and the IP detection may take a bit to run as well.
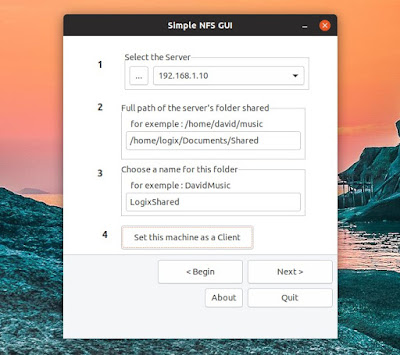
After the server list is populated, select the NFS share server IP from the dropdown. You'll also need to enter the full path of the server's shared NFS folder, and enter a name for this folder (the name needs to only contain letters).
Here how this should look:
Once you're done, click the
(Rerun the procedure if you want to add multiple folders.)
You'll now need to reboot your system. The NFS share should show up in your file manager, but it won't be mounted by default. Click it and it will be mounted as long as the remote NFS share server can be accessed.
Choose
On the second screen, click the
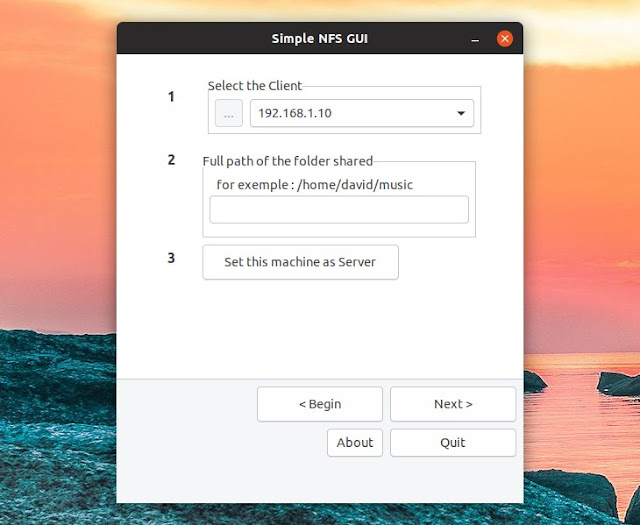
Once the client IP list is populated, select a client IP from the dropdown. You'll also need to enter the full path of the shared NFS folder. This is how it should look after entering all the required information:
Next, click the
(If you want to allow multiple clients to access your NFS server, rerun this procedure for each client.)
There's only one step left: reboot your computer.
Credits: u/sisolutions from Reddit.
Setting up a NFS mount on Ubuntu or Linux Mint can be quite a tedious task. Enter Simple NFS GUI. This is a GUI tool to easily set up a machine as a NFS server or client that should work on Ubuntu, Linux Mint and Debian.
Simple NFS GUI takes care of the whole NFS share configuration process. When setting up a NFS server, the tool automatically sets up the
/etc/exports configuration, and secures the server via /etc/hosts.deny and /etc/hosts.allow. For setting up a NFS client, the application automatically creates a directory for the mount point, as well as add the NFS mount to the /etc/fstab file with the users option, so it can be mounted by non-root users. The application also installs the required NFS packages for both server and client.I should note that while Simple NFS GUI automatically adds the network file system mount in
/etc/fstab, it sets it so the NFS is not mounted until it's accessed. You can change the NFS line created by Simple NFS GUI from /etc/fstab and replace noauto with auto to automatically mount it at boot time, but this may cause the boot process to stall.If you need to create multiple NFS shares, run the Simple NFS GUI setup process multiple times, specifying a different NFS share folder each time.
Installing and using Simple NFS GUI to set up a NFS client or server
1. Simple NFS GUI requires Gambas 3 - adding a PPA on Ubuntu and Linux Mint is required.
Ubuntu, Linux Mint and flavors / derivatives: Simple NFS GUI requires Gambas 3. I'm not sure why but Gambas 3 is not available in Ubuntu or Linux Mint, while it is available in Debian (the version in Debian jessie is too old though, but newer Debian versions all have the required Gambas 3 version). The Gambas developers are maintaining a PPA to allow installing the latest Gambas 3 in Ubuntu, Linux Mint, as well as Ubuntu flavors like Lubuntu, Kubuntu, Xubuntu, Ubuntu MATE, and so on. Add the PPA and update the software sources:
sudo add-apt-repository ppa:gambas-team/gambas3
sudo apt update
2. Download and install Simple NFS GUI
Visit this page, scroll down to the bottom and click the blue
Download Now button. Next, install the downloaded DEB package. In Ubuntu, the Gambas 3 dependencies will be automatically pulled from the Gambas 3 PPA which should be added on your system as explained above.3. Starting the Simple NFS GUI application
Don't run Simple NFS GUI from your applications menu as it won't work. That's because the application needs to be started as root, and its application menu entry runs it without admin privileges.
If your system still has
gksu (Ubuntu 16.04 and older, Linux Mint 18.x and older, Debian stretch or sid - debports), you can run Simple NFS GUI by using this command:gksu Simple_NFS_GUIFor Ubuntu 18.04 and newer, Linux Mint 19 and newer, or Debian buster, which don't have
gksu, you'll need to run the application with sudo, like this:sudo -H Simple_NFS_GUINow you can use Simple NFS GUI to set up a machine as a NFS client or server.
Use Simple NFS GUI to set up a machine as a NFS client
To setup a machine as a network file system (NFS) client using Simple NFS GUI, start the application, select
Client and click Next:On the next screen, click the
... button under Select server to select the server IP address:It may take a while until the IP list is populated, because a package may be need to be installed on your system to detect the IPs, and the IP detection may take a bit to run as well.
After the server list is populated, select the NFS share server IP from the dropdown. You'll also need to enter the full path of the server's shared NFS folder, and enter a name for this folder (the name needs to only contain letters).
Here how this should look:
Once you're done, click the
Set this machine as a Client button. Simple NFS GUI will ask you to recheck the data - if everything is ok, press Yes and the setup process is completed. (Rerun the procedure if you want to add multiple folders.)
You'll now need to reboot your system. The NFS share should show up in your file manager, but it won't be mounted by default. Click it and it will be mounted as long as the remote NFS share server can be accessed.
Use Simple NFS GUI to set up a machine as a NFS server
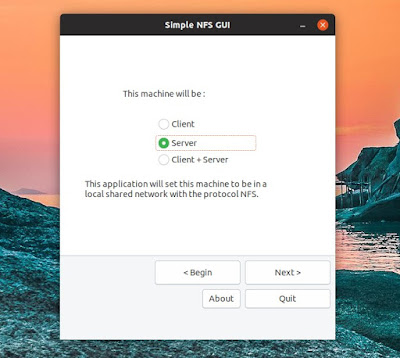
Choose
Server from the initial Simple NFS GUI screen and click Next:On the second screen, click the
... button under Select the client to select the NFS client IP address. Like I mentioned in the client section above as well, it may take a while until the IP list is populated, because a package may be need to be installed on your system to detect the IPs, and the IP detection may take a bit to run as well.Once the client IP list is populated, select a client IP from the dropdown. You'll also need to enter the full path of the shared NFS folder. This is how it should look after entering all the required information:
Next, click the
Set this machine as Server button. Simple NFS GUI will ask you to recheck the client IP and the server's folder path. If everything is ok, click Yes.(If you want to allow multiple clients to access your NFS server, rerun this procedure for each client.)
There's only one step left: reboot your computer.
Credits: u/sisolutions from Reddit.

